
This page provides instructions for planning an observation at the CHARA Array. If you are a new observer through NOIRLab, your support scientist can help you with preparing the observing plan and answer any questions about the steps outlined below.
Selecting a Beam Combiner
The choice of beam combiner will depend on the science objectives and the brightness of the target. Please see the Applying for Time page for a table of available beam combiners that lists the number of telescopes combined by the instrument, available filters, current sensitivities, and spectral resolution. Below is a brief overview of the main capabilities of each combiner:
- CLASSIC: Two-telescope near infrared combiner with highest sensitivity.
- CLIMB: Three-telescope version of CLASSIC in the near infrared.
- MIRC-X/MYSTIC: The main imaging instruments that combines light from all six telescopes in the near infrared.
- PAVO: Two-telescope visible light combiner with high sensitivity and efficiency.
Two new beam combiners are in the development/commissioning stages:
- SPICA: Six telescope visible light combiner with different spectral dispersion modes.
- SILMARIL: Three beam near infrared combiner optimized for sensitivity.
Selecting Telescopes and Baselines
The angular resolution of an interferometer is given by 0.5 λ/B where λ is the wavelength of light and B is the baseline length between two telescopes. On the longest 331 meter baseline between the S1 and E1 telescopes, the CHARA Array can achieve the following angular resolutions:
- 0.66 mas in the K-band (2.13 μm)
- 0.52 mas in the H-band (1.67 μm)
- 0.20 mas in the visible at 650 nm
A table of the available baselines and their lengths is given on the CHARA Facility page. With the availability and improved sensitivity of our suite of 6-telescope beam combiners, most observations include all six telescopes. Here are tips for selecting the number of baselines to use:
- Stellar diameters: Select at least one or two baselines long enough to resolve the star.
- Oblate shapes (rapid rotators, inclined circumstellar disks): Select multiple baselines with different position angles on the sky to map the two-dimensional structure of the source. As the earth rotates, the change in the baseline projected on to the sky provides additional coverage.
- Imaging stellar surfaces: Combine three or more telescopes simultaneously to provide multiple baseline projections as well as closure phase measurements. Closure phases measure the departure from point-symmetry. For surface imaging, it is critical to measure fringe amplitudes beyond the first null in the visibility curve (diameter > 1.22 λ/B) to provide information on the source structure at high spatial frequencies, including limb-darkening, gravity darkening, and starspots. By using a multi-telescope configuration, the shorter baselines can be used to help track the low-amplitude fringes on the longer baselines.
- Binary stars: Combine three or more telescopes simultaneously to provide multiple baseline projections and closure phases to measure the two-dimensional binary separation. For targets that can only be observed using a two-telescope combiner, then select two perpendicular baselines and obtain multiple measurements on each baseline during the night. See the Table of Companion Detection Limits for the range of separations and magnitude differences that can be measured with each instrument.
Selecting Calibrator Stars
An interferometer measures the amplitude and phase of the interference fringes. An unresolved point source will have a normalized visibility amplitude of 1 for a perfect system. For a spatially resolved star, light from across the stellar surface combines incoherently causing a drop in the visibility amplitude (the normalized amplitude will be less than 1). Instrumental and environmental effects can also cause a loss of coherence. To calibrate these instrumental effects, astronomers typically observe an unresolved point source before and after the science target in order to measure the "system visibility," which is a ratio of the measured visibility of the calibrator divided by its expected visibility. The calibrated visibility of the science target is calculated from its observed visibility divided by the system visibility.
Calibrator stars should be:
- Unresolved or of a known angular diameter.
- Within ~ 5-10 degrees on the sky from the science target. For beam combiners with a long observing cadence like MIRC-X/MYSTIC, in addition to nearby calibrators, it is useful to select calibrators that come into delay 30 - 60 min before and after the science target. That way you can maximize the amount of time spent on the target.
- Preferably within 1 to 2 magnitudes in brightness from the science target and similar in color so they can be observed with the same instrument readout mode and tip/tilt settings.
- Avoid binary stars. If possible, avoid rapidly rotating stars if the angular diameter might be marginally resolved. Check the BinH and BinG2 binary flags in the Kervella et al. (2019) catalog to avoid potential astrometric binaries.
- Select about 2 to 3 possible calibrators. One calibrator can be used if it is known to be good based on previous interferometric observations. Unknown companions are sometimes discovered.
Useful tools for selecting calibrators:
- CATCH (CHARA Array's Thrifty Calibrator Hunter) developed by GSU Graduate Students, Akshat Chaturvedi and Mahir Patel.
- SearchCal developed by JMMC.
- getCal developed by NExSci.
- When looking for bright calibrators for bright targets, it is sometimes necessary to observe calibrator stars that are marginally resolved. Selecting a bright star whose diameter has been measured interferometrically can be useful in these cases. Follow the link to view a table of stars with angular diameters that have been measured at the CHARA Array. This is not a complete listing of stars that have been observed at CHARA, but contains the results from several survey programs. Important Note: If you need to select a marginally resolved star as a calibrator, make sure that the star is not so large that you are sampling near or past the first null in the visibility curve. Features such as limb-darkening and surface features will complicate using such stars as calibrators.
Selecting Delay Settings (POP Configuration)
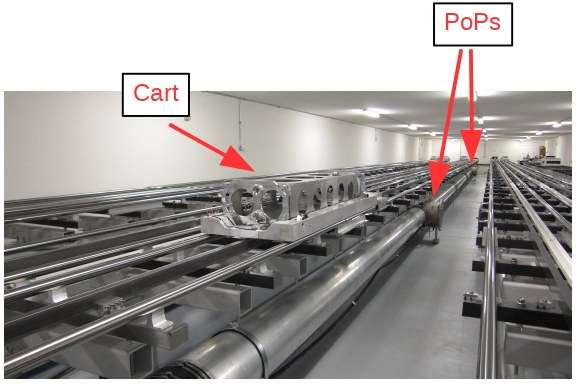
To obtain fringes, the distance that the star light travels along each beam must be the same. To compensate for the difference in path length between each telescope and the beam combination lab, we add delay to the path in two stages. The first stage occurs inside the vacuum tubes where a mirror assembly can be inserted into the vacuum pipe at fixed delay intervals of 0, 36.6, 73.2, 109.7, and 143.1 meters. These are called the POP mirrors (Pipes Of Pan). The second stage is a continuously variable delay added by movable carts that travel along delay line rails. The rails are 46 meters in length from front to back.
The position of the POP mirrors needs to be selected prior to the night of observation. Different POP settings will provide access to different areas of the sky. The POP settings can be switched during the night to follow a particular star across the sky or to provide access to stars in different parts of the sky. The overhead in changing POPs takes about 5 minutes for each telescope, in addition to another 5-10 minutes to find the new fringe offsets. To maximize efficiency, it is recommended to observe for a few hours using a given configuration before changing POPs again.
There are two software packages available for selecting the POP configurations and determining the time when each target is available for a given configuration:
- ASPRO 2 developed and maintained by JMMC. Java-based program for planning a full night of observation with multiple stars.
- chara_plan2 is part of the reduceir software package developed at CHARA/GSU. This is a linux-based program that is a duplicate of the control software and provides the most accurate timing information for one star at a time. You can bring up chara_plan2 from the command line on CHARA computers and the remote observing machine.
Please follow this link to see examples of how to plan observations using aspro2 and chara_plan2.
When selecting configurations and planning the timing of observations, you can use 12 degree twilight to estimate the starting and ending times for the science observations. Note that chara_plan2 uses civil (-6 deg) twilight as the default. Civil twilight typically corresponds to when the array operators begin pointing and aligning the telescopes. ASPRO2 uses astronomical (-18 deg) as the default, but that can be changed to nautical (-12 deg) twilight for estimating when the observations are likely to begin.
General Tips on Selecting POPs for 6T configurations:
- W2 is always on POP5,
- E1 and E2 are usually separated by one or two pop (for example, you might have E1-POP1 and E2-POP2 if nearing transit or E1-POP3 and E2-POP4 in the east). ASPRO2 sometimes recommends E1 and E2 separated by two pops (e.g., E1-POP1 and E2-POP3). While that provides a little longer delay, E1-POP1 and E2-POP2 will usually provide a longer 5T window after E1 goes out of delay.
- S1 and S2 are usually separated by one pop or on the same pop.
Observing Strategies
- Select a bright star to align the instrument and use as a fringe finder at the start of the night. Good fringe finders should be bright (2 to 3 magnitudes brighter than the sensitivity limit of the beam combiner), have strong fringes (within the first lobe of the visibility curve), and be close to the target star (within about 5 - 10 degrees). It is often useful to have an alignment star when switching baseline configurations or slewing to a new target. Sometimes a calibrator or the target itself is bright enough to use as the alignment star.
- For CLASSIC/CLIMB, select a star with K < 5 mag, diameter < 1.0 mas.
- For MIRC-X, select a star with H < 6 mag, diameter < 1.2 mas.
- For PAVO, select a star with a correlated magnitude of Vcorr = 5 - 6 mag.
Vcorr = Vmag - 2.5 x log(visibility). When on a CHARA computer, you can run the IDL code pavo_ptsrc to help select a fringe finder for PAVO.
- Interferometric observations alternate between observing calibrator stars and science targets. The observing cadence will depend on the instrument being used, the brightness of the target, and the seeing conditions. The table below lists the typical amount of time needed to observe an individual target (either a calibrator or science target).
| Beam Combiner | Time Required for Observation | Alignment Notes |
| CLASSIC | 5-15 min |
Align on bright star at the beginning of an observing sequence. Re-align every hour or if slewing to a different part of sky. |
| CLIMB | 5-15 min |
Align on bright star at the beginning of an observing sequence. Re-align every hour or if slewing to a different part of sky. |
| MIRC-X | 30-45 min |
Align using fiber explorer on every target. (AO acquisition and alignment overhead is included in time estimate). |
| PAVO | 10-15 min |
Align on bright star at the beginning of an observing sequence. Re-align every 1-2 hours or if slewing to different part of sky. |
- Therefore a calibrator-science-calibrator sequence requires 30-90 minutes. This sequence is usually called a calibration "bracket".
- Several repeated calibration brackets are typically obtained for each science target. If using two calibrators, typical observing sequences for "fast" instruments (CLASSIC, CLIMB, PAVO) are as follows:
- Cal1 - Obj - Cal2 - Obj - Cal1 - ....
- Cal1 - Obj - Cal2 - Cal1 - Obj - Cal2 - ....
- The first sequence is faster and provides more time on target. The second sequence is slower but provides a better opportunity to calibrate the calibrators against each other to check for systematic calibration errors and bad calibrators.
- Another strategy is to separate out the two calibrators, but this should only be used if the calibrators are known to be good. Because the calibrators are observed in separate sequences, they cannot be checked directly against each other:
- Cal1 - Obj - Cal1 - Obj - Cal1 - .... and Cal2 - Obj - Cal2 - Obj - Cal2 - ....
- For MIRC-X/MYSTIC, the number of observations on a science target is typically limited by the length of the observing window defined by the POP configuration. It is possible to continue observing a target outside of the 6-telescope fringe window (dropping down to 5 or 4 telescope fringes). This improves the uv coverage on imaging targets after one or more carts go out of delay.
- While conducting observations, it is useful to keep an observing log to note when instrument alignments were done and when the position of the reference cart was changed. Both of these can affect the visibility calibration, so it is recommended not to make these changes until after a calibration bracket is finished (ending on a calibrator). Following any change, it is useful to start another observing sequence on a calibrator star.
Finding Charts
When slewing to a target, it is useful to know in advance whether there are other stars in the field of view so that the telescope operators know which star to acquire. The Digitized Sky Survey is a useful tool for generating finding charts There are two cameras used when acquiring a star at CHARA: a wide field finder camera with a field of view of 3 27 x 43 arcmin and an acquisition camera with a field of view of 3.5 x 5.2 arcmin.
Submitting an Observing Request
Please follow instructions on the Logistics of Observing page to submit your observing request at least two days prior to the beginning of your scheduled observing time. If you are a new observer through NOIRLab, you can send your initial observing plan to your Visitor Support Scientist before sending in the final request. This provides an opportunity to receive feedback on the configuration and observing plan.